Importing with a portrait package
Your school photography company will provide your portrait package (PSPA format) or import the package into your software. Reach out to your school photography company to discuss this process with them.
The video reviews the import process.
If you do not have a portrait package, you can still import photos alone into your portrait manager, allowing you to use portrait page automation tools. Review this article to learn how to bring in photos with no data file.
Problems with your import? Consult the FAQ.
Portrait Import Steps
Step 1: Access Manage Portraits
Click on Manage Portraits on the side menu, and then check out your book. (Note: Checkout is required since an import may affect page order/flow.)

Step 2: Import the Index.txt file
Click Import People to start the process of importing your index.txt file. | Click Upload PSPA to open your file manager.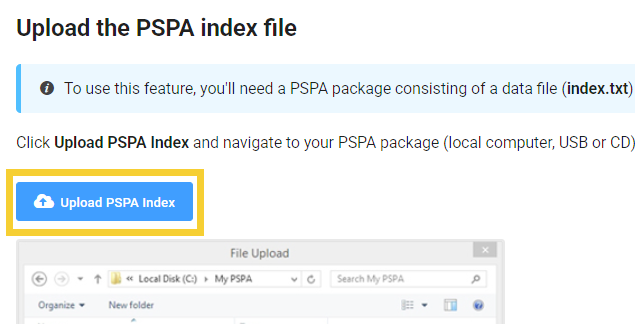 |
Navigate to the folder containing your PSPA index file, then choose Index.txt file. Click Open to upload.

Step 3: Review the data
The top row of your portrait database display column names. Verify that the column names match the information under them. 
For example, are first and last names correctly identified, or reversed? Is grade, teacher and/or homeroom info available and correctly identified.
Column names and data do not matchIf the column names and the info under them do not match; instead, click on the V on the column label to correct it.For instance, if classroom teachers' names appear under a column named Grade, change the label from Grade to Teacher Name. |  |
Data is not related to yearbookIf certain columns contain unnecessary information (eg. random codes), set the column to be ignored. This reduces clutter in your database. |  |
Duplicate column warningIf two columns have the same name, a warning will appear. Reassign one of the two columns to resolve the issue. |  |
Step 4: Complete the import
When the column names and data align, click on Import People. The database will now be imported into your book.

Step 5: Import portrait photosAfter importing your index file, a warning will appear to remind you to import the photos. Click on Import Photos to begin the process. | 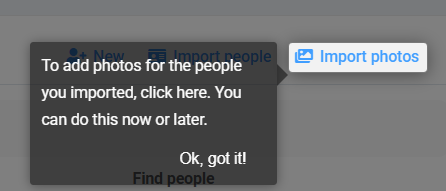 |
Click on the upload icon to navigate to the folder(s) on your system which hold the portraits. Multi-select all images (Ctrl-A on Windows, Cmd-A on Mac) to add all files within a folder at once. You can also drag the photos (one folder at a time, if applicable) to the upload icon. Note that a list of people waiting for portrait images appears below the import button.
 |  |
The images will begin uploading immediately. The Awaiting Photo Upload list will grow shorter. |  |
Step 6: View Portraits.
After uploading, click on View Portraits to see your Portrait database, complete with photos and associated information.
Multiple portrait packages may be imported. For example, your studio may provide fall and spring portraits.
Was this article helpful?
That’s Great!
Thank you for your feedback
Sorry! We couldn't be helpful
Thank you for your feedback
Feedback sent
We appreciate your effort and will try to fix the article