The page editor is where you will design your layouts, using a range of tools and features: templates, candid images, text frames, shapes, elements, and backgrounds.
Opening a page in the editor
In the book manager, hover over a page to click on the Edit button. The page editor will launch. Note: users with a role of Staffer may only open pages assigned to them in the editor. You can choose to highlight page owner status in the book manager tab to see what pages are available to edit under your login. Pages may not be available for editing if they have been submitted for review or approved by an Editor-in-Chief.
Navigating the page editor
The page editor is organized into four areas:
| A- Left-side tabs to access content and book settings | B- Top menu for project status and view |
| C- Editor features to add empty frames and attributes | D- The canvas where your page is built |
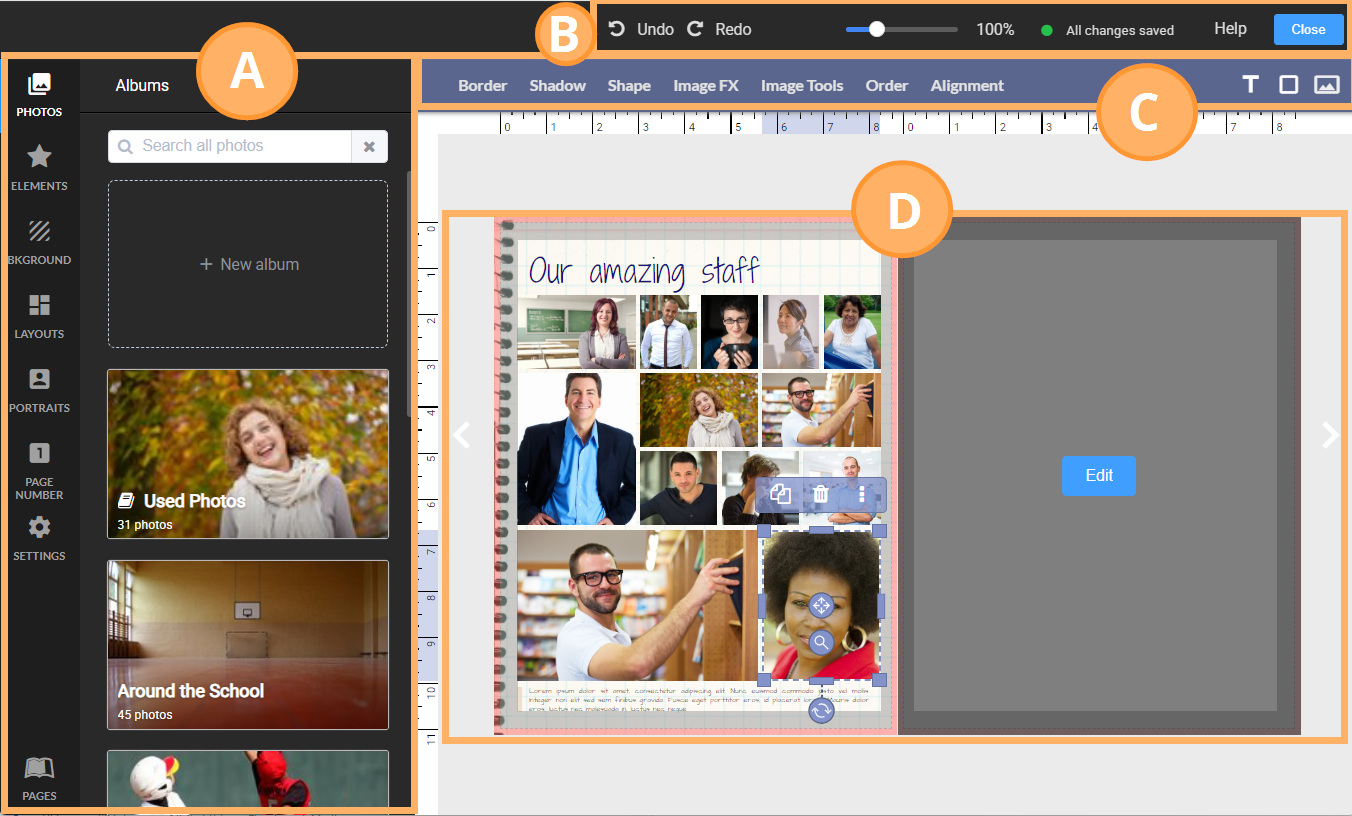
| To move to the previous or next page in the book, click on the side arrows next to the canvas. |  |
| To navigate to a different area of your book, click on the Pages tab in the bottom left corner. the section titles appear over the first page in the section. A preview of all the pages in your book will appear for you to scroll through. Click on a page preview to launch it in the editor. |  |
Accessing images, layouts and book settings
 | The left-side tab offers access to images (photos, decorations, and layouts. A- Photos tab: Access candid images in the yearbook photo albums. B-Search bar: All content tabs will enable search by filename (used as a keyword for elements and backgrounds.) C- Elements: Access clip-art decorations and word art provided by Memento (and possibly your publisher) D- Backgrounds: Access background textures provided by Memento (and possibly your publisher). Use backgrounds to fill your canvas or as color-blocking elements on your page. E- Layouts: Find premade templates to apply to your candid pages. F- Portraits: Once portraits have been flown into the book, customize the portrait layouts in this area. (Book checkout required.) G- Page Number: Turn on and position page numbering. H- Settings: Customize arrow-key nudge behavior and grid settings. I- Pages: Toggle a preview of all the pages in the book, and click on any page to open it in the editor. |
Editing tools
Here is an overview of the page editor canvas and toolbars.

A. Check In/Out Button | B. Undo/Redo Buttons Undo last changes made to the page or revert to a previous change. Available within the current editing session. | C. Zoom Slider: Drag to zoom in/out of the canvas. Hold the space bar to pan the canvas. |
| D. Save Status Notifies you when changes are auto-saved. | E. Close Editing Session End your editing session and return you to the book ladder. All changes are saved permanently. | F. Add Empty Text Frame Addd an empty text frame to the canvas. |
| G. Add Shape Frame Add a shape to the canvas. | H. Add Empty Image Frame Add an empty image frame to the canvas | I. Editor Options When an item is selected on the canvas, available editing tools show in this area. |
| J. Rulers Displays measurements, and when one or more items are selected, it shows their position and dimensions. | K. Previous/Next Page Move through the book using the arrows. | L. Active Page Indicator |
| M. Page Gutter Line Indicating the middle of a double-page spread, content may cross over this line to link pages. | N. Selected frame(s) menu Quick access tools to copy,paste, delete, and duplicate. |
Working with double-page spreads
The first and last pages of your book are, by default, a single page. All other pages in the book are presented as right- and left-facing pages. When a common background is applied to both pages or frames cross the gutter, a notification appears at the top of the canvas to indicate the pages are linked.
In the example below, a single image is used as the background, and a shape and photo cross the gutter.
If pages have been moved on the ladder resulting in a double-page spread becoming broken apart (eg. page inserted between a left- and right- side or an odd number of pages is created above the spread, converting the left page to right and the right page to left), then a warning will appear at the top of the page. Click the warning for more information, to learn how to resolve the issue or unlink the pages.


Learn more about double-page spread management on your ladder.
When adding a layout to one of the pages, be sure to note which page is actively selected. A blue line will appear over the page you are working on. When applying a layout, it will automatically appear on the selected page.

Important: If a team member with the role of staffer is assigned only one side of a linked double-page spread, then none of the content on the unassigned page is editable. They may only move frames that do not cross over the gutter or add/replace the background on their assigned page.
Zooming & panning the canvas
For a more detailed view of your canvas, use the zoom slider at the top of the editor.
To recenter the page, hold the space bar, click down on the canvas and drag it into a new position.
 |  |
Double-click the zoom slider to reset the canvas view to 100%, or move to the next page.
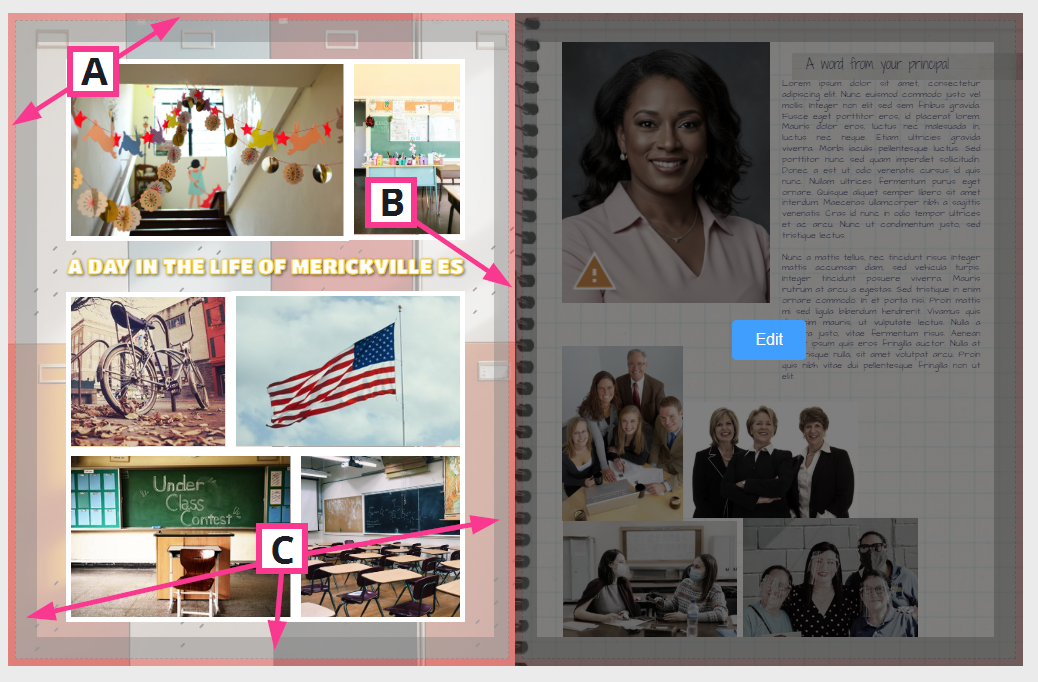
Interior Page Guidelines
Interior page dimensions (length, width) are automatically preset based on the book type assigned by your studio. Pages are surrounded by guidelines in the editor. These lines are used to assist you in placing your page content to achieve best possible results when your book is printed.
A- Red trim guidelines indicate the area of the canvas that will be cut off after the book is printed and bound. This is called the bleed area. Be sure that all backgrounds, banners or images that deliberately spill off the page edge extend over this area to the edge of the page. This ensures a clean finish to your book.
B- The gutter is the area between facing pages. Content too close to the gutter may be caught in the folds of the pages. Keep this in mind when editing across a double-page spread.
C- Gray shading defines the page margins, also known as the safe margins. Keep all text and people's faces out of this area to ensure that nothing important gets too close to your page edges.
Cover Guidelines
Covers dimensions are also preset by the book type assigned by your studio. Your book may be set up with a hard cover, a perfect bound soft cover and/or a saddle stitch cover, depending on the options offered by your studio..
Red spine guidelines are in the middle of the cover page. The more pages in your book, the larger the spine. Should you wish to add spine text, keep it small and positioned within the middle of the spine guidelines. Ask your publisher if there are any limitations for spine text (eg. not available on saddle stitch books or under a particular page count
Grey safe margins are displayed around the edge of the cover page. An additional green margin flanks the spine guidelines. Keep all text, photos of faces and important feature images within the safe margins.
A red trim area surrounds the cover page. Soft cover books will show a thin red trim line, since these are simply trimmed like an interior page. Hard cover books may show a much wider red area, representing the part of the cover that wraps behind the hardback board of the cover. Be sure to extend backgrounds and banners into this area to achieve a clean continuous look to your book.
Soft Cover (small trim area)  | Hard Cover (large wrap area)  |
Was this article helpful?
That’s Great!
Thank you for your feedback
Sorry! We couldn't be helpful
Thank you for your feedback
Feedback sent
We appreciate your effort and will try to fix the article